Copyright © ViserLab 2022
HYIP Lab is an advanced investment platform that works efficiently with all devices. This is a well-architect, powerful, secure, well-optimized, and SEO Friendly web application that comes to satisfy all investment platform owner need. HYIP Lab is ready to use web script for the business owner who wants to run and promote their next HYIP Investment business flawlessly.
The documentation will help to understand the total system and we have tried to summarize the total process of the site here. This script comes with a very simple and easy-to-use admin panel, user panel which leads to use without any coding knowledge. Additionally, this script comes with many Automated online payment gateways to make payment easier all over the world.
If needed, we will update this script continuously and come with new features and security patches. We will try to give the best user experience to all of our clients.
Thank you for purchasing HYIPLab. If you have any questions or queries that are not answered in this document, please feel free to contact us via email. We will try to respond to you as soon as possible. Thank you so much.

Do I need VPS or a Dedicated server to run this system?
No, You can run this system in a shared host as well and it will run smoothly. But if you have much traffic, you may need to upgrade your server/hosting. Our codes are highly optimized to ensure the best possible performance.
Which hosting provider should I choose for this? Do you have any suggestions?
You can choose any hosting provider that provides cPanel-based hosting. cPanel is not a must, but we recommend you to have cPanel-based hosting.
I don't have cPanel, What should I do?
Nothing to worry about, Our system will work with any control panel but cPanel is easy to manage, for that we recommend cPanel-based hosting. Also, Our free Support is limited to cPanel-based hosting only.
Do you provide hosting as well?
Yes, We do. We can provide a complete solution for your hosting. We can provide budget shared hosting, premium shared hosting, VPS, Dedicated servers, and Cluster from various geolocation. Please contact us for more details.
Installation is very easy with our Easy Installer. You can install yourself simply in few steps without any coding knowledge. We develop our installation system to make the installation process flawless and easy.
Installation Steps:
Upload the whole file to the server you have downloaded from download after purchase.
Extract/Unzip the file and move all files in the Files folder to the main folder(where you want to install it). Make sure you have moved the index.php and .htaccess as well.
Now please browse http://your-site-url/install/index.php and follow the process. Your system should be ready to use.
If you are still unable to install the system, please contact us. we offer free installation in cPanel-based hosting.
Admin Login:
your-site-url/admin

After installing the system you need to activate it. When you visit the system, you will be able to see the activation page. Just provide this information to activate and run your system. Your provided information will send to ViserLab server to verify and we never collect any sensitive or confidential data.
Purchase Code: To get purchase code Click Here.
Envato Username: Your Envato username with which you bought system.
Email: Provide your email for further communication.
The purchase code(license) is for one website or domain only. Please activate the license into the correct domain(URL) to avoid any unwanted issues in the future.

After installation, There will be two folders and two files will be in your main folder.
On the "assets" folder, We keep all kinds of assets like CSS, JS, Images. If you want To edit or change anything over CSS or js, please have a look at this folder.
On the "core" folder, We keep the core of Laravel and we maintain full MVC structure on this project.
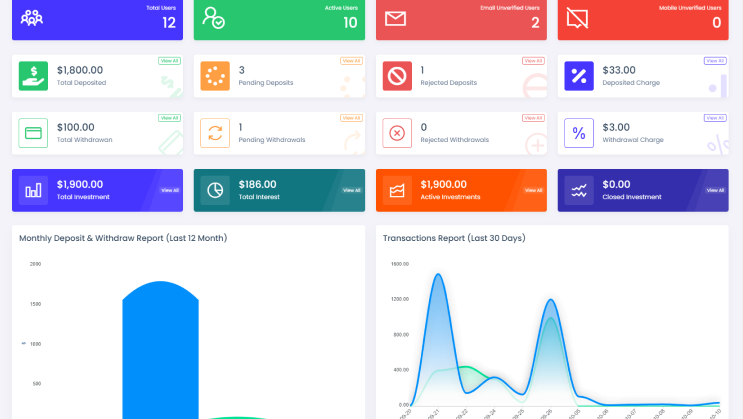
The items come with the latest Secure admin panel with a unique admin Dashboard. You can check all information and process by login on to your dashboard. You can manage all the basic information from here where the website is managed.
You'll be able to see a full overview of your system from this dashboard like how many users you've, how many deposits are made to your system, how many withdrawals are made in your system and etc. Also, you can compare the transactions of your system by seeing the graph.
Note: You can manage the everything from this dashboard! No need to edit the code or database.
You can set the basic information of your website from the general setting.
Site Title: The name of your website.
Currency: The base currency of your website.
Currency Symbol: The symbol of base currency of your website.
Timezone: Timezone of your application.
Base Color: The base color of your website. this should be a light color.
Balance Transfer Fixed Charge: Fixed amounts charges will be cut when the user will transfer the balance.
Balance Transfer Percentage Charge: Percentage amounts charges will be cut when the user will transfer the balance.
Registration Bonus: After completing registration, a user will get this bonus.

You can set the basic configuration of your website from the system configuration.
Balance Transfer : If you enable this module, users will be able to transfer the balance to each other.
User Registration : If you disable this module, no one can register on this system
Registration Bonus : If you enable this module, users will get an amount to their deposit wallet after completing registration.
Promotional Tool : If you enable this module, users will be able to copy some HTML code which contain his/her referral link and an image added by you.
Withdrawal on Holiday : If you enable it, that means the system's users will be able to make withdrawal requests on holiday.
Force SSL : By enabling Force SSL (Secure Sockets Layer) the system will force a visitor that he/she must have to visit in secure mode. Otherwise, the site will be loaded in secure mode.
Agree Policy : If you enable this module, that means a user must have to agree with your system's policies during registration.
Force Secure Password : By enabling this module, a user must set a secure password while signing up or changing the password.
KYC Verification : If you enable KYC (Know Your Client) module, users must have to submit the required data.
Email Verification : If you enable Email Verification, users have to verify their email to access the dashboard. A 6-digit verification code will be sent to their email to be verified.
Email Notification : If you enable this module, the system will send emails to users where needed.
Mobile Verification : If you enable Mobile Verification, users have to verify their mobile to access the dashboard. A 6-digit verification code will be sent to their mobile to be verified.
SMS Notification : If you enable this module, the system will send SMS to users where needed. Otherwise, no SMS will be sent.
Multi Language : If you enable Multi Language, users can switch site languages that you added in the Language module.

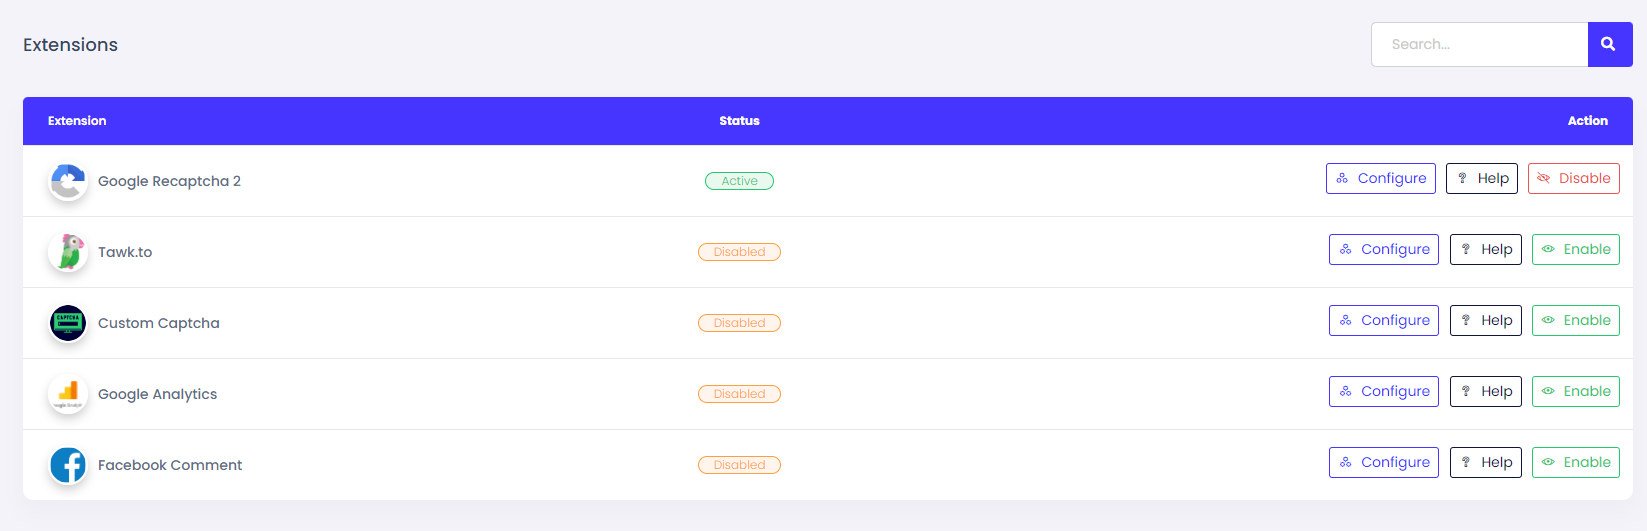
It is a unique feature for you. We have added all the important and required plugins in our admin panel. You will have full control over these plugins and you can configure them as you want.
Google Recaptcha 2: Google Recaptcha 2 is used for protect robotic request to your system. To get google recaptcha 2 credentials Click Here
Tawk.to: Tawk.to is third party live chat platform. You can enable this extension by providing api key from tawk.to
Custom Captcha: This extension also protect robotic attack to your system. This is not third party extension. This is internal extension of our system
Google Analytics: This extension is used to track your visitors. Overview of your web page and visitors are tracked by google analytics. To get credentials of google analytics, Click Here
Facebook Comment: Facebook comment is used to manage blog's comments of our system. If you enable this, a facebook comment box will be shown in blog page. To get credentials of facebook comment, Click Here
SEO now becomes a very important part of any website, and that is why we have added a simple but powerful SEO manager tool in the admin panel. Now you can set your SEO keywords, meta tag, and OG image from your admin panel without paying anyone. SEO setting is just one-click away.
SEO Image: This image will show when you'll share the site link anywhere.
Meta Keywords: Put here some keywords related to your site. This will help to rank your site to search engines.
Meta Description: This description will show in search engines. Also, related descriptions will help to rank your website in search engines.
Social Title: This title will show when sharing the link to social media.
Social Description: This description will show below the title when sharing the link to social media.

Nowadays, many website owners want to localize their websites. They want to set many languages so users can choose and see the website in their mother language. But they can not set as many other software providers don't give that option Built-in and they charge a high amount of money to set that, In our product, you need not to pay any single penny for that. we include a unique language manager where you can easily set any language within a very short time.

The main problem of online business is accepting the payments. And we tried our level best to solve this problem. We have added 20+ Automated online payments gateways! YES, 20+ gateways. You can control all of them from the admin panel and you do not need any coding knowledge for that. Additionally, you can set manual gateways as well.
Step 1: Enable a gateway that you want
Step 2: Click the edit button and go to the edit page of this gateway.
Step 3: Provide required credentials.
Step 4: Select a currency and click add new option. This select box is shown at the top of the page
Step 5: Provide currency title minimum and maximum deposit range, fixed and percentage charge, and rate to your site currency.
Step 6: Click the submit button and your gateway is ready to receive payments if everything is ok.
Step 1: Click the "Add New" button. Now you'll be able to see a form to setup this gateway
Step 2: Provide basic required information.
Step 3: Provide instruction to users. This instruction will show to users. This instruction is referrers that how to send the money.
Step 4: Set some user data that you want. This is the proof of payment. After sending the payment you've to confirm that. So that you need payment proof. That's why you need to set up this section.


Withdraw process of this system is manual. That means you've to add a withdraw method and user will send you withdraw requests. You've to confirm that manually
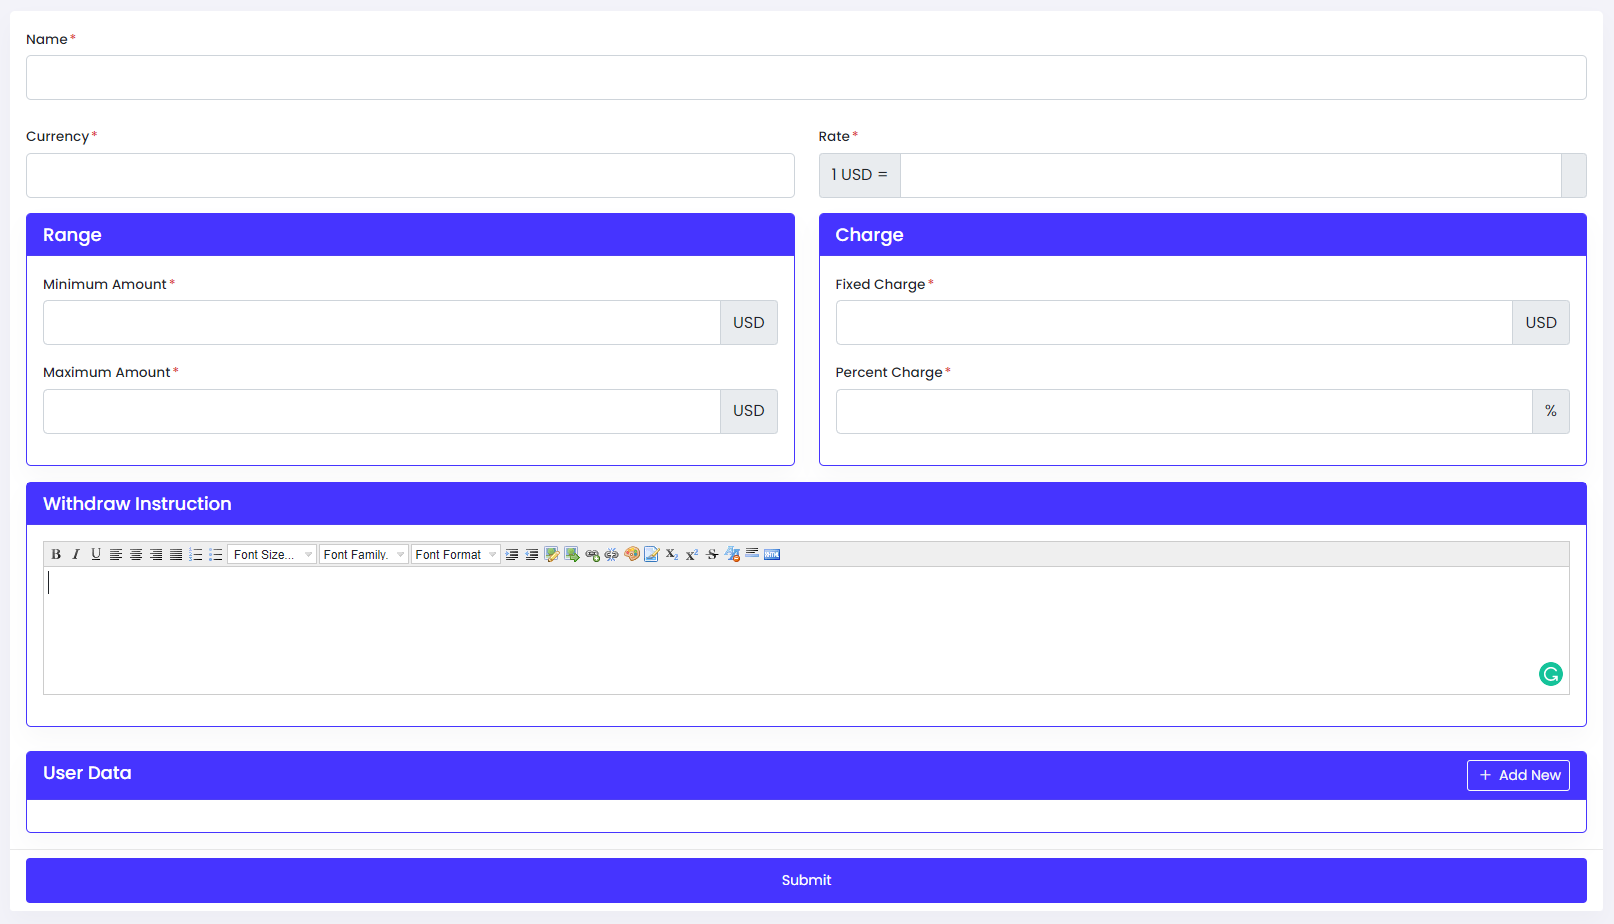
Step 1: Click the "Add New" button. Now you'll be able to see a form to setup this method
Step 2: Provide basic required information.
Step 3: Provide instruction to users. This instruction will show to users. This instruction is referrers that how to make request for withdrawal.
Step 4: Set some user data that you want. This is the proof of payment. After submitting the request you've to confirm that. So that you need a proof. That's why you need to set up this section.
The User Dashboard is designed for users. Users can manage everything on their dashboard, according to the pricing plan, they will be able to buy packages, can withdraw amounts, and can see the wallet.

Once again, thank you so much for purchasing this Script. As I said at the beginning, I'd be glad to help you if you have any questions relating to this Script. No guarantees, but I'll do my best to assist. If you have any queries, please feel free to contact us at Support Center.
Email Us: https://viserlab.com/support